
Troubleshooting and fixing a Samsung fridge that is not cooling properly can involve several steps. Keep in mind that some issues might require professional repair, especially if you’re not comfortable working with appliances or if the problem seems complex. In this blog post, I will cover how to fix a Samsung fridge that is not cooling. Here’s a general guide to help you identify and potentially fix the issue.

If you are new to the blog, welcome! I blog about cleaning, decluttering, and organizing. You can find more free printables to help you get organized in the drop down menu under the Printables category. You can get my Free Printable Home Maintenance Record here.
How to Fix a Samsung Fridge That is Not Cooling
- Check the Power and Settings:
- Make sure the fridge is plugged in and the power outlet is functioning.
- Check if the temperature settings are correct. The freezer should be around 0°F (-18°C) and the fridge around 37°F (3°C).
- Inspect the Door Seals:
- Check the seals around the doors. If they are damaged or not sealing properly, cold air can escape, causing cooling issues. Clean the seals and ensure they’re making proper contact with the fridge.
- Clean the Condenser Coils:
- Dust and debris on the condenser coils can reduce cooling efficiency. Unplug the fridge and clean the coils, usually located at the back or underneath the fridge. You can use a vacuum cleaner or a brush for this.
- Check for Obstructions:
- Ensure that there are no items blocking the air vents inside the fridge and freezer compartments. Proper airflow is essential for efficient cooling.
- Defrost the Freezer:
- If the freezer is completely frozen over, it might restrict airflow. Unplug the fridge, empty the freezer, and let it defrost naturally or use a hairdryer to speed up the process. Don’t use sharp objects to remove ice, as this can damage the evaporator coils.
- Inspect the Evaporator Fan:
- This fan circulates cold air from the freezer to the fridge. If it’s not working, the fridge won’t cool properly. Listen for the fan running or check for any obstructions. If it’s not working, you might need to replace the fan motor.
- Check the Compressor:
- The compressor is responsible for cooling the refrigerator. Listen for a humming sound near the back of the fridge. If you don’t hear anything, the compressor might be faulty and need replacement.
- Test the Thermistor: (This was MY ISSUE, which I’ll detail below)
- The thermistor is a sensor that monitors the temperature inside the fridge. A faulty thermistor can cause temperature inaccuracies. You might need a multimeter to test its resistance. If it’s not within the expected range, consider replacing it.
- Call for Professional Help:
- If you’ve tried the above steps and the fridge still isn’t cooling properly, or if you’re uncomfortable with any of the troubleshooting steps, it’s best to contact a professional appliance repair technician. They have the expertise and tools to diagnose and fix more complex issues.

Remember that safety is a priority when working with electrical appliances. Always unplug the fridge before attempting any repairs or maintenance. If you’re unsure about any step, it’s safer to consult a professional.
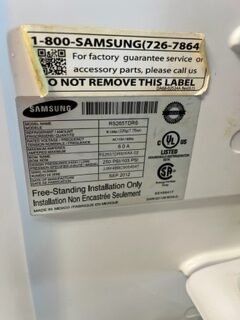
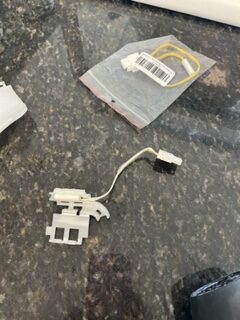
My issue was with the temperature sensor. I had my Samsung refrigerator inspected by a professional and this was his diagnosis. I found some instructions along with the part online, and then I repaired it myself. For the record, I have a Samsung Fridge model RS265TDRS, which you can see on the label here. I used temperature sensor part number 10109W, which I bought on Amazon for under $10. Now, I will cover step by step how to fix a Samsung fridge that is not cooling.
How to Replace a Temperature Sensor on a Samsung Fridge & How to Fix a Samsung Fridge that is Not Cooling
Replacing a temperature sensor (also known as a thermistor) on a Samsung fridge can vary depending on the specific model, but I can provide you with a general guide on how to approach this task. Keep in mind that working with appliances involves some level of technical knowledge, and if you’re not comfortable, it might be best to seek professional help. Here’s how you might go about replacing a temperature sensor:
Note: Before starting, ensure that the fridge is unplugged to prevent any electrical hazards. These are the instructions and I’ll go through each step with photos below.
- Locate the Thermistor:
- The thermistor is usually a small sensor attached to a wire inside the fridge and freezer compartments. Its exact location can vary depending on the model of your Samsung fridge.
- Access the Thermistor:
- Depending on the model, you might need to remove shelves, drawers, or panels to access the area where the thermistor is located. Consult your fridge’s user manual for specific instructions on how to access the thermistor.
- Disconnect the Old Thermistor:
- The thermistor will likely be connected with a plug or wire harness. Gently disconnect the plug or harness from the refrigerator’s wiring. Take note of how it’s connected, as you’ll need to replicate this with the new thermistor.
- Remove the Old Thermistor:
- The thermistor might be secured in place with a clip or mounting bracket. Carefully remove any fasteners holding the thermistor in place. Be gentle to avoid damaging any surrounding components.
- Install the New Thermistor:
- Place the new thermistor in the same location where the old one was removed. Secure it with any clips or brackets that were present.
- Connect the New Thermistor:
- Connect the new thermistor to the fridge’s wiring using the plug or harness. Ensure it’s connected securely and properly. Refer to your notes from earlier.
- Reassemble the Fridge:
- Put back any shelves, drawers, or panels you removed earlier to access the thermistor.
- Plug in the Fridge:
- After ensuring that everything is securely in place, plug the fridge back in.
- Test and Monitor:
- Power on the fridge and monitor its temperature over the next several hours. Check if the temperature readings are now accurate and stable.
It’s important to note that specific models might have variations in their design and component placement. Always refer to your fridge’s user manual for model-specific instructions. If you’re unsure about any step or if you encounter difficulties, consider seeking assistance from a professional appliance technician.

Remember, safety is crucial during any appliance repair. If you’re not confident in your abilities, it’s best to rely on professional expertise to avoid any potential hazards or further damage to the appliance.
How to Fix a Samsung Fridge That is Not Cooling
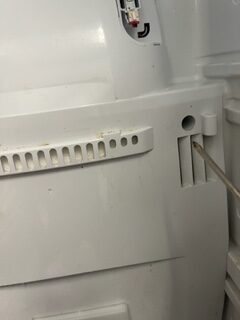
Step 1: Locate the Thermistor: Mine is on the back of the interior of the fridge behind a large plastic panel. Remember, do all of this with the fridge unplugged and disconnected from all power sources.
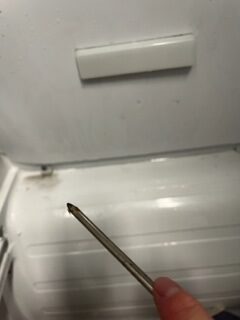
Step 2: Access the Thermistor: Pull out any shelves and drawers to access this panel. You are going to need a phillips head screwdriver to take off this panel. Mine has six screws total that need to be removed. I used a small dish to hold the screws, so I wouldn’t misplace them while I worked. First, you will remove the two light covers as seen below and remove the two screws behind that as pictured below.
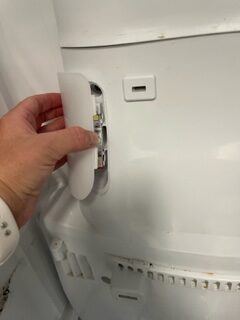
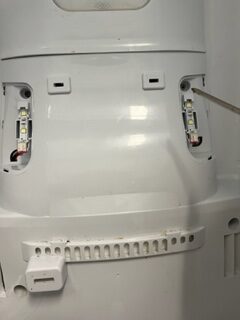


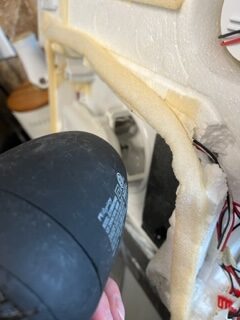
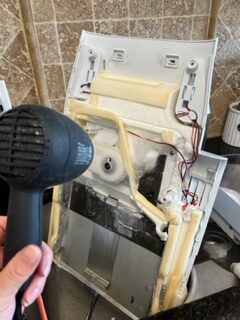
After removing all six screws, you will need to remove this entire plastic panel carefully. If it is frozen onto the fridge, you will need to use a hairdryer to melt the ice to remove it. As you remove the panel carefully, you will need to unplug the wires behind the top left corner, as seen below.
My panel had huge chunks of ice on it that was preventing it from working, and this repair will keep that from happening again. You will need to place this panel in the sink and melt the ice with a hairdryer. You will also want to use the hairdryer on the inside of the fridge if you see any ice there. Ice build up will prevent the fridge from working.
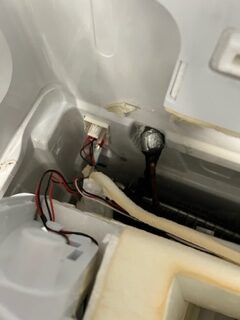
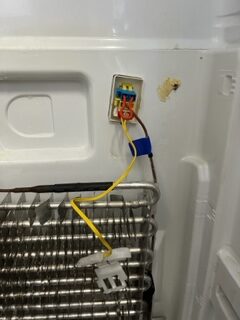
Step 3: Disconnect the Old Thermistor: This is the bottom cord on the right hand side. Mine was zip tied so I have to cut the zip ties off with a wire cutter. Be careful not to cut your wires. My sensor was white with a white wire. The end is inside the clear plastic piece that is connected to the coil, so we will have to open that plastic covering to replace it.
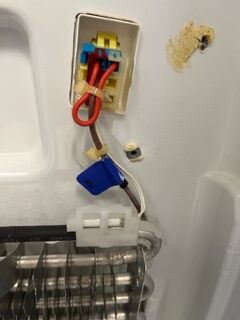
You may need to remove these plastic pieces to unplug the sensor. You can see in the photo below.
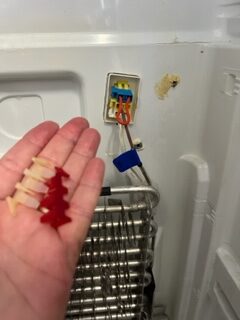
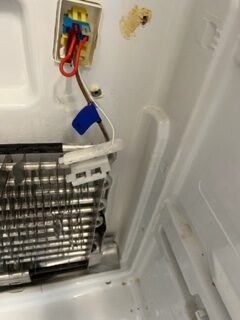
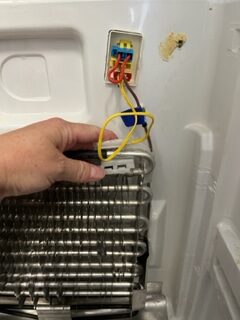
Step 4: Remove the Old Thermistor: After unplugging the sensor and removing the clear plastic cover, we will remove the old sensor from the coil.
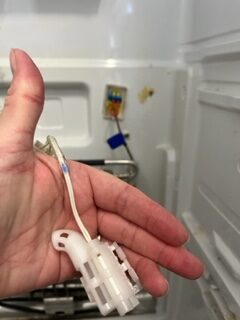
Step 5: Install the New Thermistor: Remove the old sensor and snap the new sensor into that clear plastic cover pictured here.
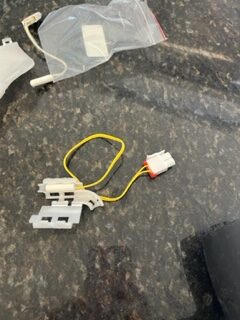
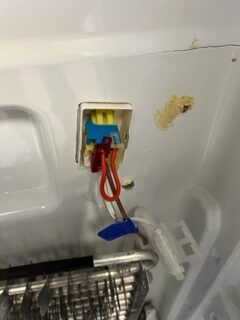
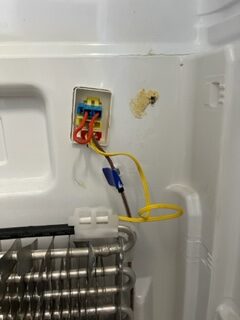
Step 6: Install the New Thermistor: Plug in the new sensor and reattach the clear plastic part that holds the other end of the sensor. Snap the cover closed once it is attached to the coil. If there is ice on the coil, you need to melt it with the hairdryer.
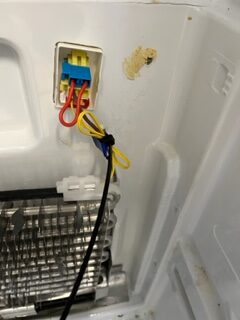
Step 7: Connect the New Thermistor: After you have your new thermostat/temperature sensor plugged in and connected, you will want to zip tie any excess wire length.
Step 8: Reassemble the Fridge: Make sure you have no more ice on that panel and then reinstall the panel with the six screws. Wipe up any water that has melted on the interior of the fridge. Also, make sure to plug in the wires you disconnected at the top left behind the panel.
Step 9: Plug in the Fridge: After everything is connected properly and you have replaced the shelves and drawers, you can plug it into the wall outlet. Some models will need to be reset. My Samsung fridge has a touch screen that adjusts the temperature. I set mine to the correct temperature. The freezer should be around 0°F (-18°C) and the fridge around 37°F (3°C).
Final step: If the temperature sensor on your Samsung fridge was the problem, you will see it corrects the cooling issue pretty quickly. My fridge is now working great and cooling as it should.
Remember, safety is crucial during any appliance repair. If you’re not confident in your abilities, it’s best to rely on professional expertise to avoid any potential hazards or further damage to the appliance.
Recent Comments