
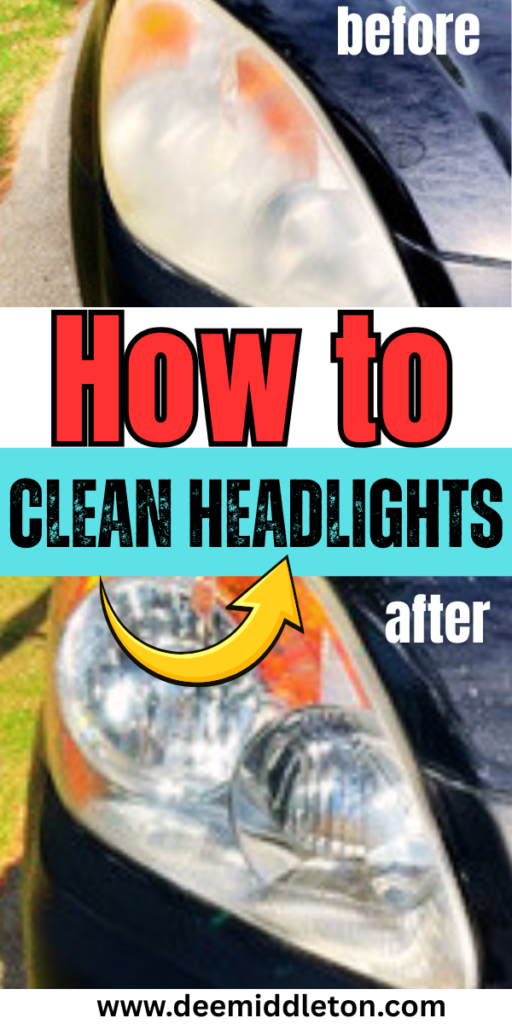
Clear, bright headlights are essential for safe driving, but over time, they can become cloudy and dim, diminishing both the appearance of your vehicle and its visibility on the road. Fear not, though, as restoring your headlights to their former glory doesn’t have to involve costly professional services. With a few simple tools, some elbow grease, and a little know-how, you can easily tackle this task yourself, saving both time and money. In this comprehensive guide, we’ll walk you through the step-by-step process of how to clean headlights, ensuring optimal visibility and a rejuvenated look for your vehicle. I will cover the before and after results of using 2 different products, so be sure to read both before you decide which product you want to use.
How To Clean Car Headlights
Dirty or cloudy headlights reduce the amount of light that makes it out from the headlamp and onto the road, where you need it. It impairs the scattering of the beam thus causing glare. It’s even possible to fail a driver’s test for cloudy headlamps, as it ruins the light scattering. A garage or detailing shop will often charge as much as $60 to clean car headlamps, so it’s worth doing it yourself and looking at other methods.
I had read many differing suggestions on how to clean headlights using home products ranging from bug spray to toothpaste. I have tried the toothpaste option with little results. I was looking for significant results to improve the look of my van headlights, so I decided to buy a kit that had good reviews.

As with any product I review, I do not take legal responsibility for the use of the product. I am providing this review for information purposes only. Should you try this product, I do not accept any liability for any damage you encounter. Use at your own risk.
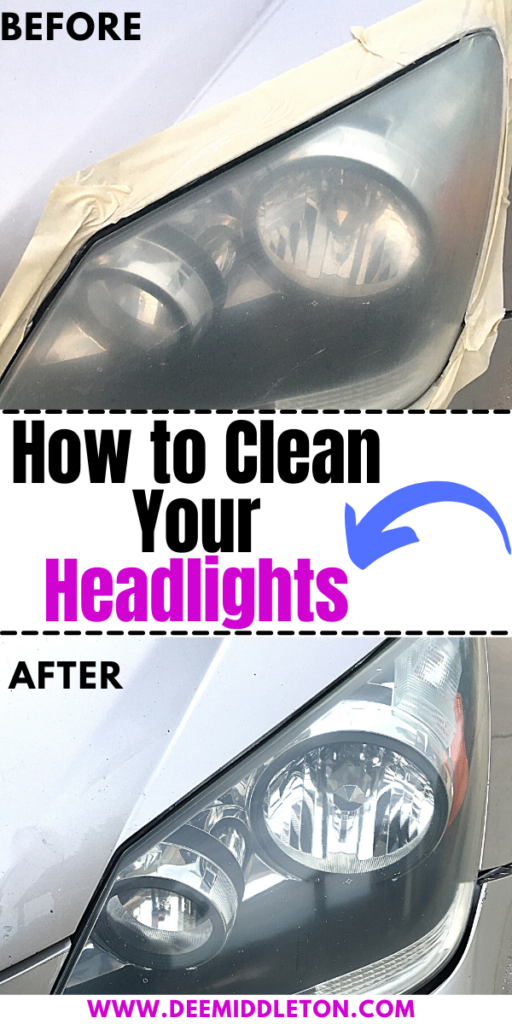
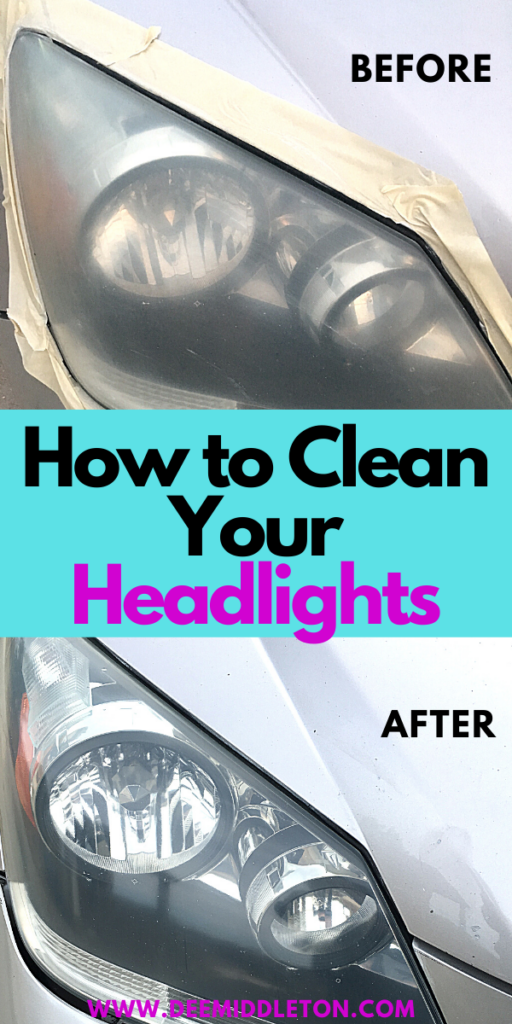
I wanted to review the product I purchased. It is called Meguiar’s Headlight Restoration Kit, for which I have read great reviews . I bought the heavy duty version because of the condition of my headlights. They looked very similar to the ones in the before photo on the box.
We tried this product last night and had amazing results. Our headlights were oxidized and yellow in color. I was aiming to improve the look of the lights as well as the brightness.
Meguiar’s Headlight Restoration kit is a brand that had excellent reviews, so I thought I would give this one a try. It has existed for some time, and it’s easy to use. I chose the more expensive version (about $30) over the less expensive version because the higher priced kit allows you to attach your pads to an electric drill to speed the polishing process. Otherwise, you have to buff the product onto the headlights by hand, which is tiring and less effective.
My results and the product I used speak for themselves. I now have beautiful, clear headlights, even though my vehicle is more than 10 years old.
There are multiple ways of cleaning headlights, but utilizing Meguiar’s Headlight Restoration Kit is one of the best that I’ve used with success. So I thought I’d share a few specifics about cleaning. You can buy this product in stores that sell auto parts or even many big brand box stores.
I was impressed with the clarity of the headlights. I can now see the details inside the lights themselves.
The way to clean your headlamps is easy: – Cleaning cloudy car headlamps with Meguiar’s Headlight Restoration Kit is very fast and simple, and in a few minutes you’ll have lovely, clear headlight lenses again. As mentioned above, the advantage of using this method is that this kit utilizes polishing pads that you connect to your electric drill to speed and improve the process. For really badly clouded headlamps, it will make a huge difference, and in my opinion, it is definitely worth a go.
Supplies needed: Microfiber cloth, small bowl of water, electric drill, Meguiar’s Headlight Restoration kit
Easy 2 Step guide:
Step 1. Lightly wash the headlamp and surrounding area with soap and water – This is only to remove any grit which could be sitting on the headlights. Even though the vehicle’s plastic headlamp is very sturdy, you don’t need to risk creating scratches if you rub any of the product on paintwork around the headlamp. So, you may want to tape around the headlight to keep from scratching your paint.
Step 2. Follow the steps outlined on the exterior of the packaging. This will ensure you use the product correctly to improve and polish the headlight lens. You should take note and be very cautious to avoid touching the paint as this could mark your paint. Depending upon how badly discolored your headlamps are, this could take up to fifteen minutes of constant polishing for each headlight and you’ll have to re apply the product into the polishing fabric every couple of minutes.
Ours were very heavily oxidized and the process still took only 15 to 20 minutes from start to finish. I am still very happy with my results as you can see below.
This product should do the job for most clouded and oxidized headlights. To get a more thorough deep cleaning, you can also try fine grit sandpaper. But, this method will scratch the lenses and will require you to buff out the scratches. I do not recommend using sandpaper, but a kit like Meguiar’s Headlight Restoration will greatly improve the look of the headlights.
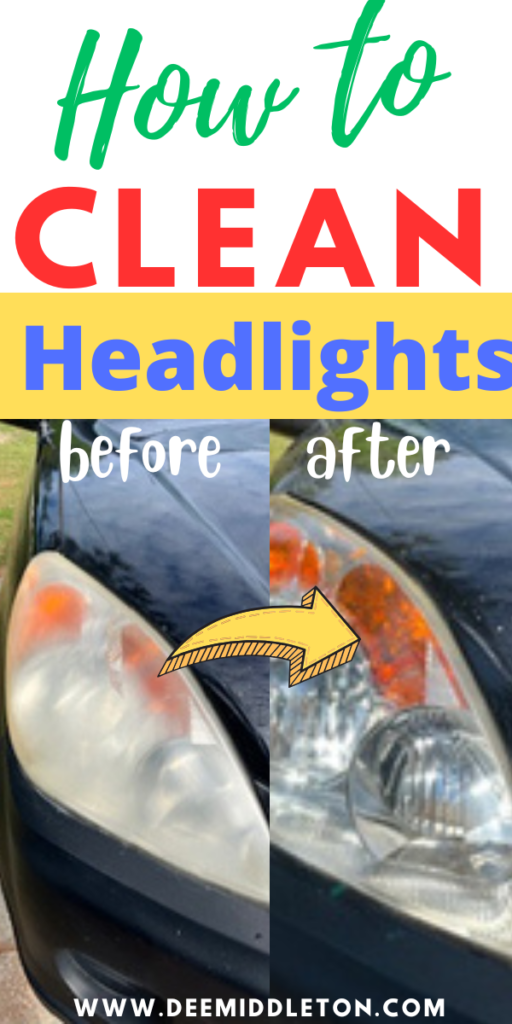
Next let’s look at using the 3M Restore and Protect Headlight Restoration Kit pictured below.
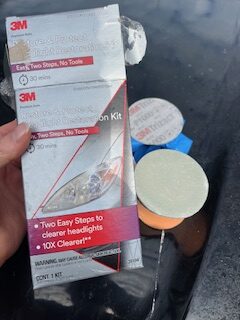
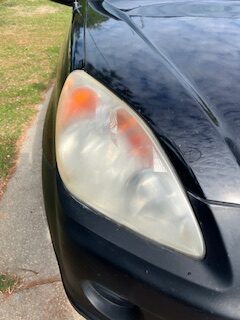
The kit comes with gloves, 2 sanding disks and a sanding handheld tool, and 2 packets of the headlight clear coat. For this kit, you manually sand the headlights to remove the yellow oxidation. You first use the highest grit sandpaper disc followed by the lower grit disc. There are easy instructions enclosed. I followed the instructions to get these results. Below is the before photo.
I think I spent maybe 10 minutes on each headlight in total. The manual option worked just as well for me and the power tool option mentioned above. You are supposed to wet sand them, so you either need a water spray bottle or a water hose so you can keep them wet as you sand. I used water hose.
I think the biggest tip is that you may be afraid of adding the clear coat when your headlights still look cloudy, so I am adding my mid journey pic to show what the headlights looked like after sanding but before the clear coat. You can see that below.
As you can see mid process, the headlight looks clearer but still somewhat cloudy. This is completely okay per the instructions. Just work to remove the yellow cloudy surface by following the sanding instructions. It will still look somewhat like mine even after sanding. The next step will solve that.
The final step, in my opinion, is the real hero. It involves drying the headlight and adding the clear coat. You will need to wear the gloves here. I did not. The residue will remain on your skin and is similar to a sugar glue residue on your skin. Don’t repeat my mistake. Wear the gloves. This is the clear coat picture below.
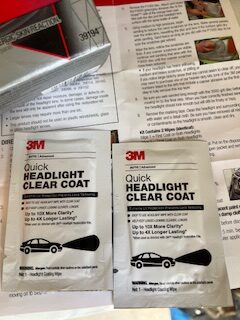
I have read and seen videos saying that you can reapply this clear coat a few times a year to maintain these results, so I plan to buy some of these packets. You can buy them individually rather than having to buy this kit again.
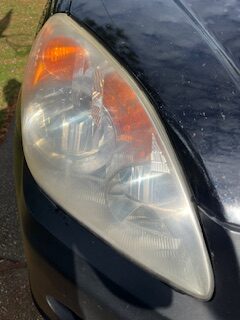
After I applied the clear coat, these are my final results pictured below. I am very pleased. I think they look brand new. This was money well spent and I would highly recommend this product.

Below is the other headlight.

I hope you have found this article to be helpful in cleaning your headlights. Please subscribe and follow my blog to gain more tips on how to clean everything in your home.
Also, you can get the complete digital printable copy of the Year Long Thorough Declutter Series Calendar and Checklists here. The printable digital download is delivered to your email. It includes 25 pages of printable calendar pages and checklists to help you declutter every room in your home. You can sign up here.
Struggling with the daily housekeeping chores? Check out my ebook on this topic, entitled Make Over Your Homemaking. Use this link to get it at a discounted price.
My How to Deep Clean Your Kitchen list can be found here.
My How to Deep Clean Your Bathroom list can be found here.
My How to Deep Clean Your Kids’ Rooms list can be found here.
My How to Deep Clean Your Living Room list can be found here.
My How to Deep Clean Your Bedroom list can be found here.
Also, to keep up the general housework, you may need to create a daily housekeeping schedule that suits your specific needs. To do so, I have created a helpful series you can read here.
Need some Inspiration to Declutter? Join us for the Year Long Through Declutter Series by subscribing by email below. To subscribe, just leave a comment below.
Happy Decluttering!
New to deemiddleton.com and don’t know where to start? I recommend going in this order:
Step 1: Check out this post on the 1st step you should take to get organized. If you don’t have a calendar, you can grab my free weekly printable calendar page here. It is in my shopify store, but it is totally free, so you won’t be prompted to put in any payment information. It is a free download and will be delivered straight to your email.
Also, you can get the complete digital printable copy of the Year Long Thorough Declutter Series Calendar and Checklists here. The printable digital download is delivered to your email. It includes 25 pages of printable calendar pages and checklists to help you declutter every room in your home. You can sign up here.
Step 2: Create a daily Housekeeping Schedule. You can use this series to start to set up your own schedule. You can also use this simplified weekly schedule.If you often ask: What is the fastest way to clean a dirty house? Or, if you struggle to get organized and have tried and failed time and again, you can likely find out which of these 11 reasons cause you to fail to get organized.
Step 3: How do you remove clutter?.…Sign up for the Declutter Series and get your entire home decluttered in just 30 minutes a day, 5 days a week.”Declutter Your Home” checklists are provided in each email.
Step 4: What is the fastest way to clean a dirty house? Use a timer and use the Deep Cleaning Checklists above. They will help you get your home sparkling after you’ve decluttered.
Interested in becoming a full-time blogger like me? Check out my blogging series. At the top of every page on my blog, you’ll find a drop down menu. Just select the BLOGGING category.
Check out the most popular posts on deemiddleton.com:
14 Things That Make Your Home Look Cluttered
How to Create a Daily Housekeeping Schedule
How to Clean House When You Are Completely Overwhelmed By Clutter
What is Preventing You From Getting Organized?
Also, check out a great post on decluttering over here from becomingminimalist.com. Joshua Becker has some great tips on decluttering and minimalism.
For further reading, check out the fly lady here. She has some great cleaning and kitchen decluttering ideas plus excellent organization tips to get you started.
Recent Comments